Stewart who was suffering from a stomach virus was not able to attend the race and his teammateCevert had to fill the top spot at Elf Tyrrell. Rookie manager Dave K. took charge of Team Surtees.
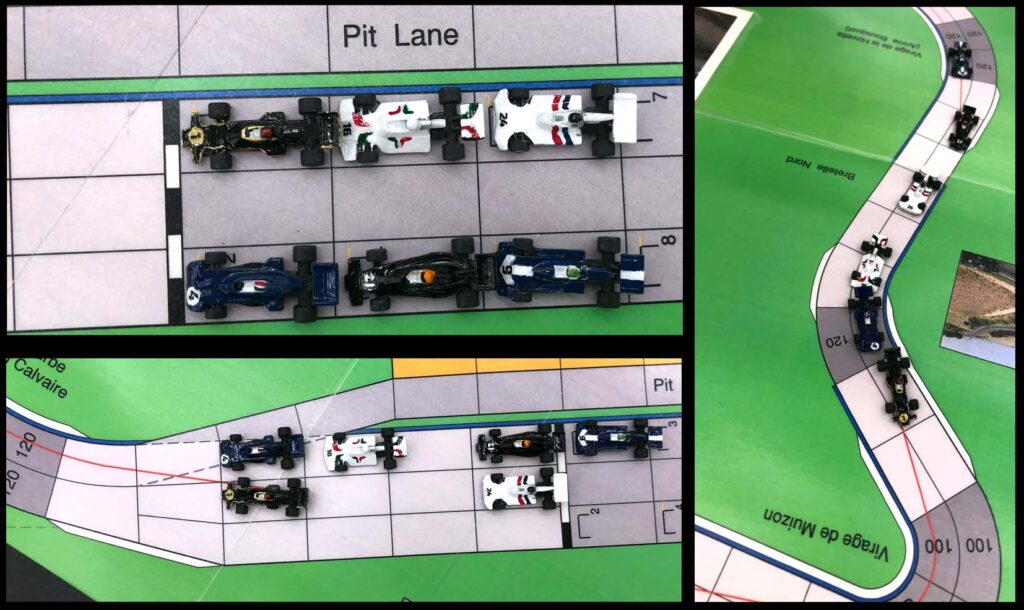
Fittipaldi put his #1 black Lotus on pole. Cevert shared the front row with Fittapaldi. Shadow and Brabham occupied the second row. Pace made his season debut in the Surtees and shared the 3rd row with a very eager James Hunt.
Fittipaldi held on to the lead at the start of the race. Cevert pressured Fittapaldi. Hunt gained two positions early on.
Cevert made a bold move to pass Fittapaldi in the corner before the front straight and crossed the finish line ahead of him to end the first lap.
During the second lap, Cevert tried to pull further ahead, but Fittapaldi stayed close behind. Reutmann also kept Hunt at bay.
Cevert started the third and final lap in the lead. Oliver built momentum, but then spun his Shadow in the Courve du Calvaire dashing his hopes for the race. Pace took advantage of Oliver’s misfortune and passed him. Then Fittapaldi spun in the Virage de la Hovette falling out of the second position.
Cevert held the lead until the end claiming his first victory of the season. Hunt defeated Reutmann’s defense and took second place. Reutmann shared the podium in the third spot. Oliver and Pace had a drag race down the front straight with Pace coming out on top.
Race details follow:
1st Den (F. Cevert) 80/40/20/160/5 W** 2nd Steve (J. Hunt) 60/60/40/180/4 S 3rd Terry (C. Reutemann) 80/40/40/160/4 S 4th John H. (E. Fittipaldi) 80/40/40/160/4 S 5th Dave K. (C. Pace) 40/60/40/160/5 W 6th AJ (J. Oliver) 60/40/40/180/4 S
Note: this was the first recorded win for a weak down-force setup car.
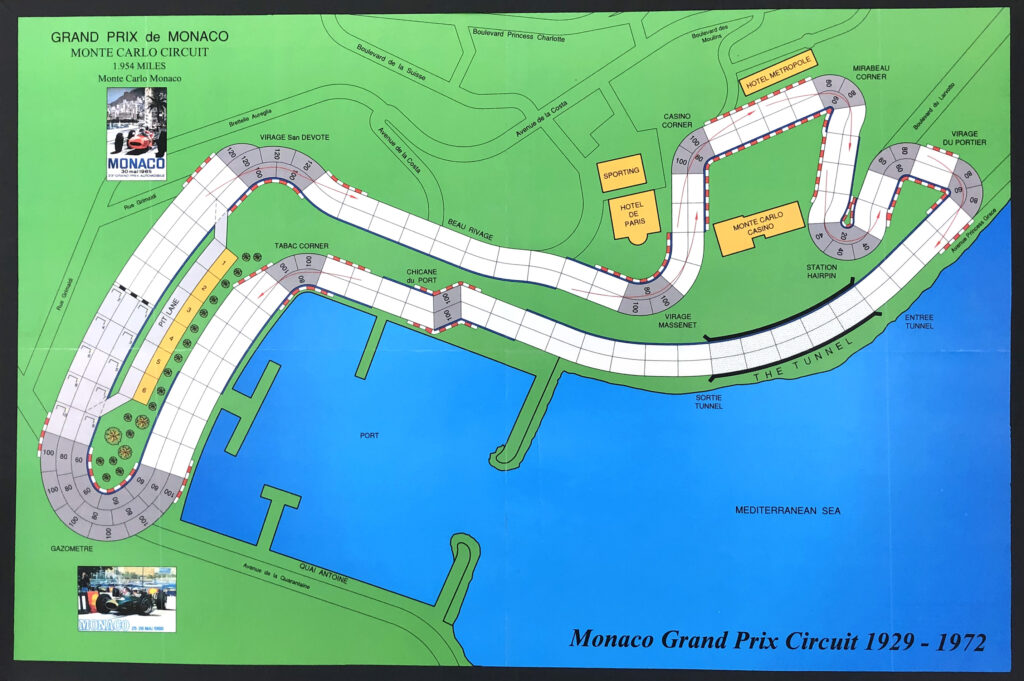
Five teams competed in the Monaco Grand Prix this season fielding nine drivers. Martini’s lone driver, Amon, sat on the pole position and shared the front row with Elf’s Stewart. Brabham’s Reutmann and Elf’s Cevert secured the second row followed by William’s Galli and Brabham’s W. Fittapaldi. Team Hesketh filled the fourth row with Hunt and Purley.
The Race Begins At the 2023 Monaco GP!
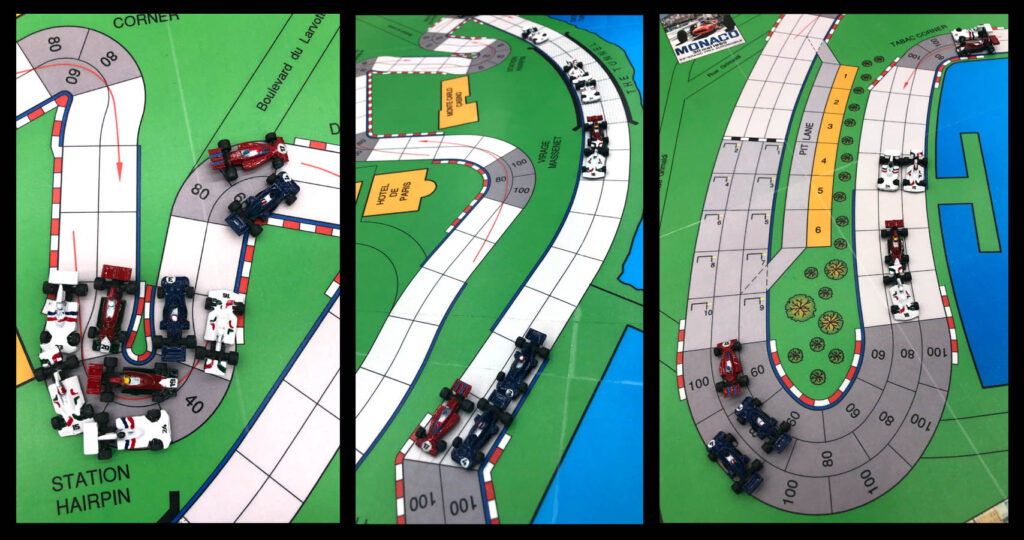
Amon and Stewart set the pace and seemed to be pulling away from the pack. But the other drivers caught up to them at the Station Hairpin.
The Leaders Breakaway During the First Lap at Monaco.
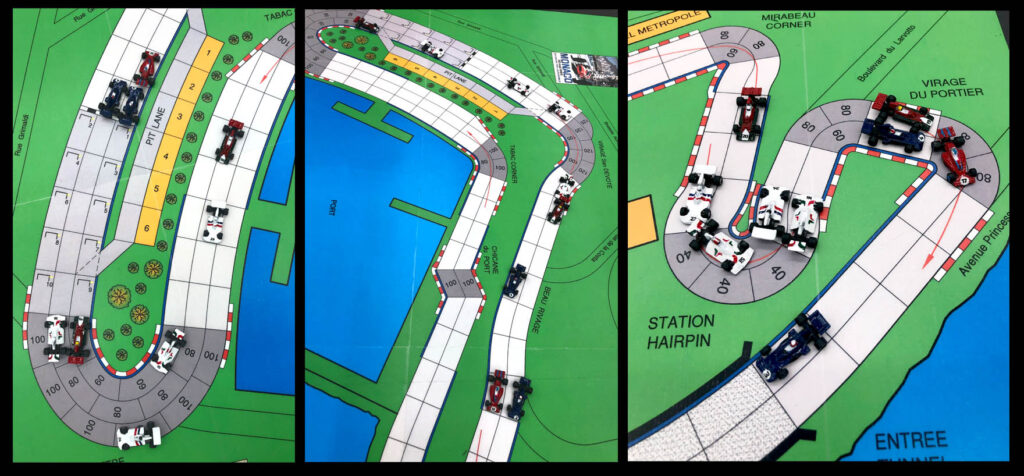
Exiting the Station Hairpin, Cevert passed Stewart and gained an inside advantage on Amon. Then Cevert, Stewart, and Amon exited the corners ahead of the rest and extended their lead through the tunnel. Cevert attempted to slingshot Stewart into the lead going into the Gazometre, but the attempt failed and Amon gained the lead. Meanwhile, Williams, Hesketh, and Brabham battled for fourth.
The Battle for Lap 2 at Monaco.
Amon finished the first lap with Stewart and Cevert on his heals. Cevert began to slow and Williams caught him at the Virage Du Portier. Stewart extended his lead heading into the tunnel for the second time. The Brabhams and Heskeths were in a fierce struggle.
Fierce competition at Monaco.
Amon caught up to Stewart and they raced neck-and-neck going into the Gazametre, but this time Stewart exited first and gained the bonus point for lap 2. Hunt broke away from the Brabhams and started to reel in Galli.
Stewart stayed off Amon and they built a large lead midway through the 3rd and final lap. Hunt passed Williams and tried to close the gap with the leaders going into to the Station Hairpin.
The 3rd and Final Lap at Monaco.
Stewart’s car faltered and he began to slow. Amon got by Stewart. Hunt smelled blood in the water, but could not catch the leaders. Amon crossed the finish line two spaces ahead of Stewart. Hunt finished 3rd followed by Cevert. Congratulations to Dave for the Win!
Race details follow:
1st Dave M. (C. Amon) 80/40/40/140/5 S* 2nd Den (J. Stewart) 80/40/40/160/4 S* 3rd Steve (J. Hunt) 60/60/40/140/5 S 4th Den (F. Cevert) 80/40/40/140/4 S 5th Travis (N. Galli) 60/60/40/140/5 S 6th Terry (C. Reutemann) 60/40/40/140/6 S 7th Terry (W. Fittipaldi) 60/40/40/140/5 S 8th Steve (D. Purley) 60/40/40/140/5 S 9th Travis (Howden) 40/40/40/160/5 W
Monjuic hosted eight teams this year. Shadow’s Oliver (#21) held pole position sharing the first row with Elf’s Stewart (#3). The second row was occupied by contenders Reutmann (#16) and Fittipaldi (#1). Galli (#19) and Von Opel (#28) filled the third row. The final row included Hunt (#26) and Beltoise (#13).
Stewart got the jump on Oliver and led through the first corner. Initially, the rest of the pack stayed in a tight formation.
Stewart and Oliver battled for the lead. Oliver made a move, but lost control of the Shadow going into La Pergola. Galli began reeling in Stewart. Meanwhile, Hunt weaved his way to the 5th position.
Galli stayed glued to Stewart looking for an opening. Oliver closed in on the leaders, but spun-out again. Hunt passed Fittapaldi avoided the spinning Shadow and secured 3rd.
The second lap heated up as Fittapaldi and Hunt battled for third place and Stewart and Galli dueled for first. Galli’s Williams began to fade just as Stewart pushed the Elf through Sant Jordi.
Stewart began to build separation. Hunt had fallen back to fourth, but rebounded by making a series brilliant moves in the El Anulo de Miramar, Rosseleda, and Font Del Gat, ultimately moving into second.
Stewart led the third and final lap finishing in first place for the third race in a row. Hunt finished 2nd, and Fittapaldi 3rd. Race details follow:
1st Den (J. Stewart) 80/40/20/160/5 S** 2nd Steve (J. Hunt) 60/40/40/160/5 S 3rd John H. (E. Fittipaldi) 60/40/20/160/6 S 4th Travis (N. Galli) 60/20/40/160/6 W 5th Terry (C. Reutemann) 60/40/40/160/5 S 6th Dan (R. von Opel) 60/40/40/160/5 7th AJ (J. Oliver) 80/40/20/160/5 8th Ray R. (J. Beltoise) 60/40/40/160/5 S
Use normal speed circuit rules with the following variations.
Teams
If six or less players attend a race, then each player should field 2 cars. If 7 or more players are present, then the players must agree whether 2 cars are allowed. A player may always choose to only field 1 car.
Skill Points.
Each team is assigned 2 skill points per lap. For example at the beginning or a 3 lap race a team would be assigned 6 skill points. Players use skill points instead of rolling a die in most cases. Players decide before rolling dice whether or not to use a skill point. Points do not need to be pre-assigned to a specific team member.
Car Construction.
When a player controls more than one driver he must assign 5 build points to one driver 4 to the other.
Dice Rolls.
Instead of rolling1d6 on tables roll 2d6. Higher rolls are always better. All tables have been adjusted to reflect the changes.
Advantage or Disadvantage.
When rolling with Advantage or Disadvantage roll 3d6 instead of 2. For Advantage add the highest 2 dice. For Disadvantage add the lowest 2 dice. In both cases ignore the 3rd die.
Down Force Settings (for winged cars).
Before assigning build points the player must choose the downforce of each car and use the corresponding row on the Performance Chart. The player must choose one of the following settings for each of their cars independently:
Down Force
Advantage
Disadvantage
Normal
None.
None.
Strong
Chance Table, Testing Brakes
Exceeding Acceleration and Top Speed
Weak
Exceeding Acceleration and Top Speed
Chance Table, Testing Brakes
Grid Order.
There are 4 grid groups. Cars in a lower numbered grid group will be placed on the starting ahead of cars in a higher numbered grid.
Step 1: Place all cars in a grid group based on their starting speed:
Start Speed
Grid Group
80mph
2
60mph
3
40mph
4
Step 2: Starting with cars in group 4, players may spend 1 wear point to move a car into the next lower numbered grid group. A car may only move down one grid from its starting group.
Step 3: Starting with the lowest numbered grid group containing cars, place cars on grid starting positions. If there is more than one car in a group, then the players roll 2d6 for each car. A player may spend a skill point to roll with Advantage. The car with the highest roll result is placed on the grid first. Tied cars will continue to roll off until the tie is broken. Spent wear and skill point are not available for the race.
Late Breaking.
To avoid a collision or slow down for a corner, a player may choose to reduce his written speed before moving. The speed reduction takes place in the space before the collision would occur or before a corner is entered. Consult the Deceleration Chart and add 20 to the total amount the car is over its Max Deceleration. If the player chooses not to slow down to avoid a collision, then use the normal collision rules.
Pass Through.
When all lanes are blocked on a straightaway, instead of a collision a player may attempt to pass through one of the squares containing another vehicle. If not blocked, then the passing player may spend 1 wear or roll on the Pass Through Table. The player may spend a skill to roll with advantage.
The player being passed through may allow or attempt to block the pass through. If the player attempts to block, then the passing player may call off the passing attempt or continue. If the passer continues, then both players must roll on the Pass Through Table with Disadvantage (roll 3d6 add lowest 2). You may spend one skill point to nullify the Disadvantage.
Pass Through Table
2D6
Passer
Blocker
7-12
Successful Pass.
No effect
3-6
Spinout.
Spinout
2
Spinout and use one wear.
Spinout and use one wear
Corner Acceleration.
Players may accelerate a car starting on the last space of a corner (the last space with a speed limit). Cars starting in a corner, but not in the last space of a corner, may not accelerate. Cars that spin in a corner may accelerate using start speed on their next turn, even if they are not on the last space of the corner. Cars starting in the last space of a corner are not impacted by the space’s speed limit.
Long Tracks
If 1 lap of a track is equal to or exceeds the length of an average 3-lap race and one lap is planned, then calculate Wear and Skill points as if the race was 3-laps. This rule applies to tracks like Steve’s realistically long Nurbergring.
Scoring
During a race, the first car to complete the 1st lap receives a bonus point. The first car to complete the 2nd lap also scores a bonus point. All cars that complete a race score points. Cars that do not finish the race do not score points (unless they earned bonus points for leading laps 1 or 2). If 12 or fewer cars start a race use the following formula to determine finishing points: 1st = Number of Cars +3; 2nd = Number of Cars +1; 3rd the Number of Cars -2; 4th = Number of Cars -3; 5th = the number of cars -4; etc. Continue this pattern. If more than 12 cars start a race, then use 12 for the Number of Cars in the above formula. Cars finishing beyond 12th place receive 1 point. If an odd number of cars below 12 start a race, round down to the next even number. If less than 6 cars score using 6 cars. Use the following table to score points:
Scoring Table
Place
12 or More Cars
10-11 Cars
8-9 Cars
7 or Less Cars
1
15
13
11
9
2
13
11
9
7
3
10
8
6
4
4
9
7
5
3
5
8
6
4
2
6
7
5
3
1
7
6
4
2
1
8
5
3
1
9
4
2
1
10
3
1
11
2
1
12+
1
13
1
Bonus for Lap 1/2
1
1
1
DNF or Crash
0
0
0
0
Updated Charts:
Start Speed Chart
2d6 Roll
Result
6 – 12
Successfully Exceed Start Speed by 20mph
4 – 5
Lose Grip – Set Speed to 20 mph
2 – 3
Stall – no movement this turn
Note: May spend one skill point to avoid roll. If a car stalls 2 turns in a row it is out of the race.
Acceleration Chart – roll when exceeding Acceleration Rate or Top Speed
1st “2-4” rolled
Engine Damage – lose 20 mph in both Acceleration (minimum 20 mph) and Top Speed (min 140 mph) values for duration of race, including current turn
2nd “2-4” rolled
Engine Burned Out – out of race
Note: May spend skill point to avoid roll. Strong Downforce rolls with Disadvantage. Weak Downforce rolls with Advantage.
Deceleration Chart – roll when exceeding Deceleration Rate
MPH over max deceleration
Penalty
20
Use 1 Wear point OR Test Brakes
40
Use 1 Wear pointsAND Test Brakes OR Use 2 Wear points
60
Use 2 Wear points AND Test Brakes
80
Use 2 Wear points AND Spinout AND Test Brakes
Test Brakes
1st “2-4” rolled
Use 1 Wear point AND wear penalties for Deceleration and Cornering are doubled for duration of race.
2nd “2-4” rolled
Brakes Burned Out – out of race
Note: May spend skill point to avoid roll. Strong Downforce car rolls with Advantage. Weak Downforce rolls with Disadvantage.
Cornering Chart – roll when exceeding proper speed limit through any corner space
MPH over Speed Limit
Penalty
20
Use 1 Wear point OR roll on Chance Table
40
Use 2 Wear points OR Use 1 Wear points AND roll on Chance Table
60
Use 2 Wear points AND Spinout OR Use 2 wear points AND roll on Chance Table
80
Crash! – out of race
Chance Table
2d6 Roll
Result
8 – 12
Safely Cornered
7
Skid – Reduce Speed to 20mph under speed limit
4 – 6
Spinout
2 – 3
Crash! – out of race – roll on the Crash Chart
Note: Spend Skill Point to avoid roll. Strong down-force car rolls with Advantage. Weak down-force car rolls with Disadvantage.
Pass Through Chart
2D6
Passer
Blocker
7-12
Pass Through
No Penalty
3-6
Spinout
Spinout
2
Spinout and Use One Wear
Spinout and Use One Wear
Notes: If unblocked while passing through, use 1 Wear or consult the pass through chart. If blocking occurs, both drivers roll on the Pass Through Chart with disadvantage (one skill may be used to nullify the disadvantage).
Crash Chart – If speed under 60mph, then roll with Advantage. If speed over 100mph, then roll with Disadvantage.
2D6
Result
8 – 12
No Significant Injury
4 – 7
1 Race Injury
2 – 3
1D6 Race Injury (If 6 is rolled then the result is a Season Ending Injury and roll again. If another 6 is rolled then result is Fatal Injury.)
Notes: After missing a race, a Race Injury is reduced by 1. In order for an injured driver to race, the driver’s team must spend 1 Skill point for each point of Race Injury. If an injured driver races, then Race Injuries are not reduced and additional skill points may not be spent on the driver during the race. If an injured driver sustains additional Race Injuries, add them to the total of existing Race Injuries. Injured drivers roll with disadvantage.
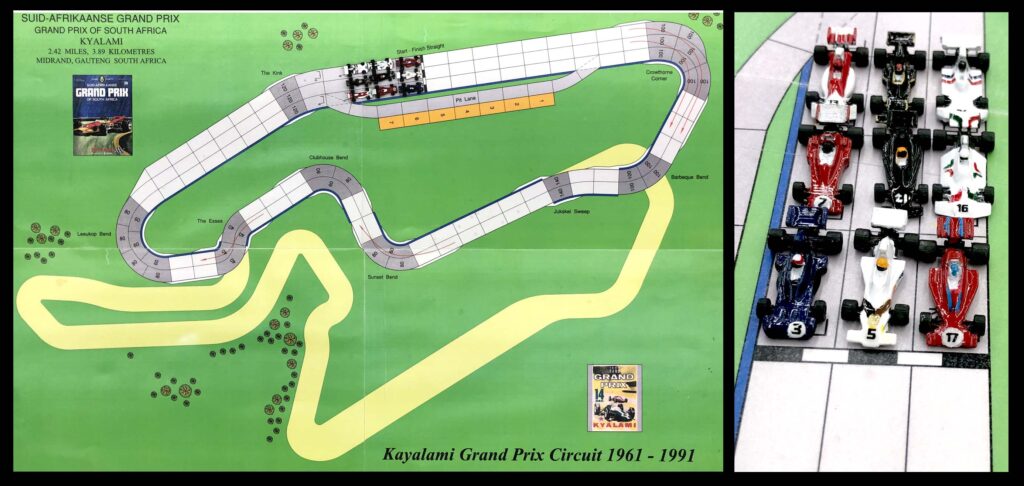
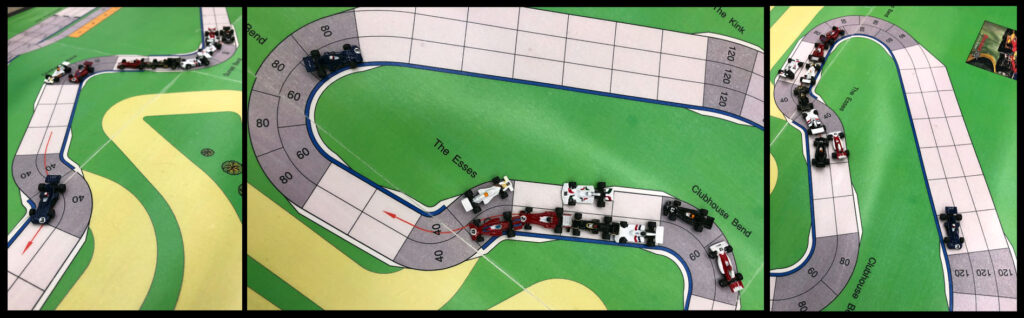
Nine teams populated the Kyalami grid. Stewart in Tyrrell (#3) held the pole position and shared the front row with Hulme in the McLaren (#5), and Amon in the Martini Techno (#17). The second row featured Ickx in the Ferrari (#7), Oliver in the Shadow (#21), and Reutmann in the Brabham (#16). Beltoise in the Marlboro BRM (#13), Fittapaldi in the JPL Lotus (#1), and Hunt in the Hesketh March (#24) secured that third and final row.
Starting Grid at Kyalami 2023.
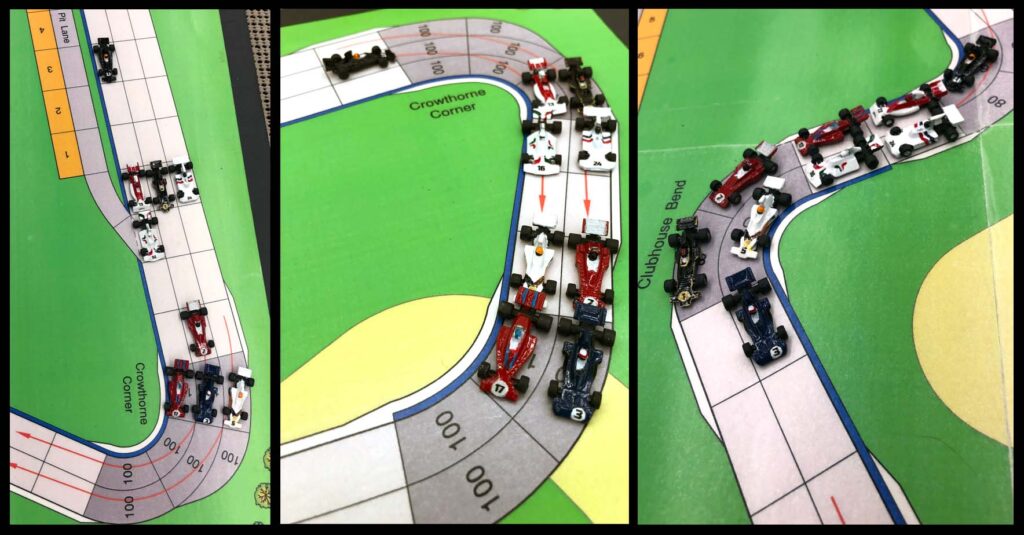
The front row cars dashed off the start finish line closely followed by the Ferrari. Meanwhile, Oliver mis-shifted and spun the Shadow’s tires resulting in a poor start. The field squeezed though Crowthorne Corner and into the narrow part of the track. Amon took the lead, but lost monentum and was passed by several drivers. Fittapaldi meticulously maneuvered his Lotus through the pack and found himself beside Hulme going through Clubhouse Bend just behind Stewart the leader.
First lap a kyalami 2023.
Some of the vehicles were already showing signs of stress. The BRMs brakes were malfunctioning and the Ferrari’s engine was losing power. The field was expending a large amount of were points.
Hulme and Fittapaldi were putting a great deal of pressure on Stewart. Then, Fittapaldi spun in the Esses. Stewart managed to exit the Leeukop ahead of the field gaining a substantial lead. The McLaren, Martini, and Ferrari were next out of the corner and in hot pursuit of Stewart.
First lap Kyalami 2023. The Lotus spins while Tyrrell takes the lead.
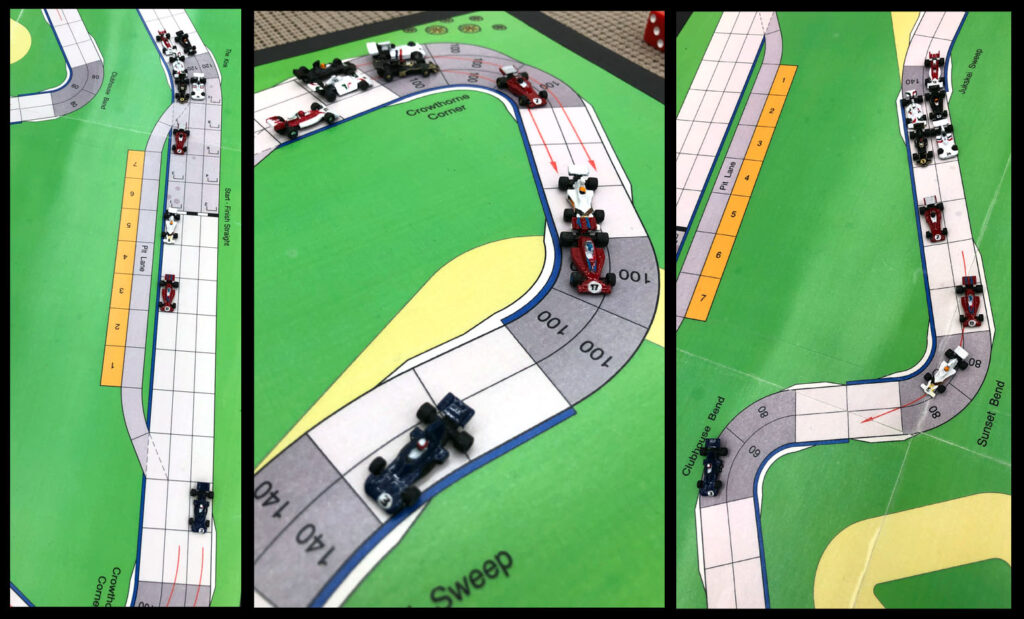
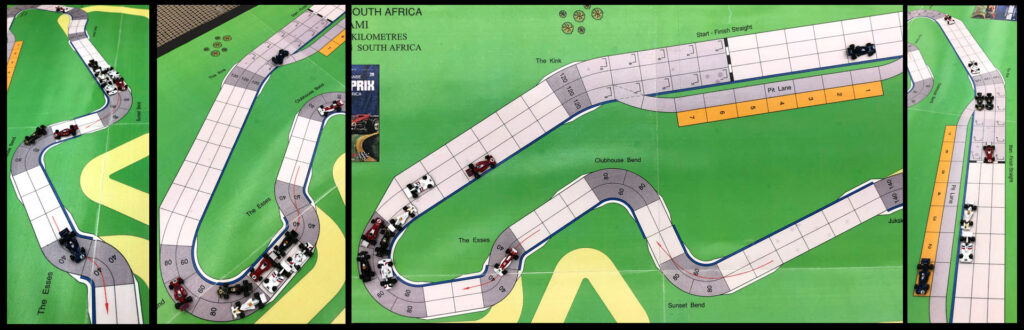
Stewart maintained the lead. Hulme and Amon jockeyed for second while trying to close the gap on Stewart. Ickx, in his wounded Ferrari, struggled to stay with the leaders. Hunt, who had started in last place, began to make some progress.
Second lap at Kyalami 2023. Stewart keeps the lead and the battle for second continues.
Hulme pushed a little to hard and spun his McLaren in the Esses. Stewart capitalized on the disruption in the field to charge out of Leeukop Bend and extend his lead once again.
Second lap at Kylami. Stewart extends his lead and Hulme spins-out.
Stewart looked untouchable and unless he made a dire mistake he would win the race. The competition for position in the field escalated. Reutmann, Fittapaldi, and Amon went three wide down the front straight battling for second position. Fittapaldi seized second closely followed by Amon through Barbeque Bend. Reutmann fell back and fought Ickx fourth.
Third lap at kyalami 2023.
Stewart did not make a mistake and smoothly drove the Tyrrell to victory, but the race was not yet over. Amon got around Fittapaldi and secured second place. Hunt successfully executed a series of daring maneuvers through the Esses, Leekop Bend, and the Kink to blast through the field and take third place. He was closely followed by Hulme in the McLaren.
Stewart wins at Kyalami 2023.
Race finish details follow:
1st Den (J. Stewart) 80/40/20/160/5 S** 2nd Dave M. (C. Amon) 80/40/20/160/5 S 3rd Steve (J. Hunt) 60/40/40/160/5 S 4th Ray G. (D. Hulme) 80/40/40/140/5 S 5th Stephen L. (J. Ickx) 60/40/40/160/5 (Eng Dam) 6th John H. (E. Fittipaldi) 40/40/40/160/6 S 7th AJ (J. Oliver) 60/40/40/160/5 S 8th Terry (C. Reutemann) 60/40/40/160/5 9th 5th Ray R. (Beltoise) 60/40/40/160/5 (Brake Dam)
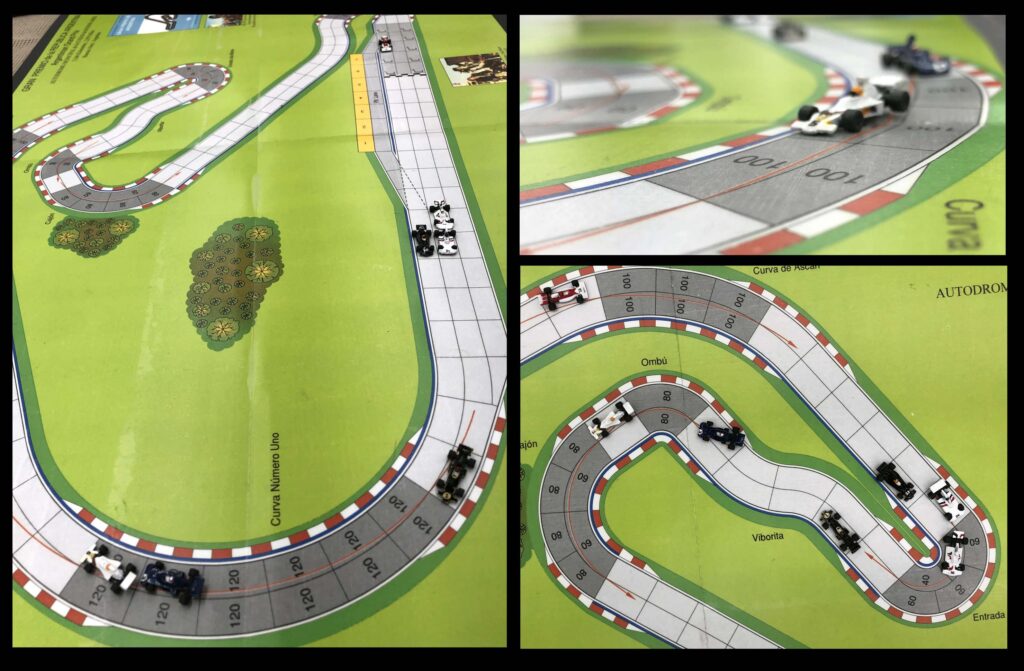
Seven teams took to the grid inaugurating the Table Top Racing Club’s 13th season of Speed Circuit. The race also marked the first appearance of the UOP Shadow racing team managed by AJ. Unfortunately, Travis, last year’s champion team manager, was not present.
J. Stewart started in pole position in the Elf Tyrrell and Hulme in the Yardley McLaren shared the front row. Lotus and Shadow held the second row. The Tyrrell, McLaren and Lotus bolted at the start and were three wide down the front straight. Stewart gained an early lead. The Shadow began to have engine problems.
Hulme and Fittapaldi challenged Stewart’s position. Hulme got the upper hand and completed the first lap ahead of Stewart.
During the second lap, the McLaren and Tyrrell led the pack while exchanging positions several times. Hulme and Stewart pushed their machines to the limit.
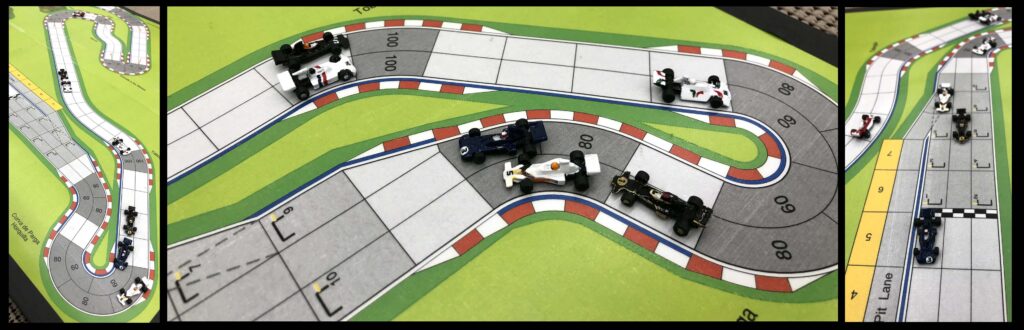
The McLaren lost grip in the corners and began to slow. Stewart took back the lead and finished lap 2 ahead of Hulme. Fittapaldi passed Hulme and made Stewart his next target.
Hulme spun-out in Curva Numero Uno and then again later causing him to fall further back. Stewart began nursing the Tyrrell while Fittipaldi charged the Lotus gaining the first position.
Fittipaldi was not able to shake Stewart and they ended up side-by-side going into the last series of corners. Fittipaldi had the inside position and it looked like he had secured victory, but then he spun-out. Stewart maneuvered around the spinning Lotus, seized the lead and captured the win!
Fittipaldi finished 2nd followed by Reutemann in the Brabham. The Shadow’s engine gave out and Oliver was not able to finish the race.
Race details follow
1st Den (J. Stewart) 80/40/20/160/5 * 2nd John H. (E. Fittipaldi) 60/40/40/160/5 S 3rd Terry (C. Reutemann) 60/40/40/160/5 4th Steve (J. Hunt) 60/40/40/160/5 S 5th Ray R. (Beltoise) 60/40/40/160/5 6th Ray G. (D. Hulme) 60/40/40/160/5 S* DNF (Engine) AJ (J. Oliver) 60/40/40/140/6 S
Our next race is at Kyalami hope to see you there.
SPEED CIRCUIT 2023 Season 13 House Rules (28 Dec 2022)
Use normal speed circuit rules with the following variations.
Teams
If six or less players attend a race, then each player should field 2 cars. If 7 or more players are present, then the players must agree whether 2 cars are allowed. A player may always choose to only field 1 car.
Skill Points.
Each team is assigned 2 skill points per lap. For example at the beginning or a 3 lap race a team would be assigned 6 skill points. Players use skill points instead of rolling a die in most cases. Players decide before rolling dice whether or not to use a skill point. Points do not need to be pre-assigned to a specific team member.
Car Construction.
When a player controls more than one driver he must assign 5 build points to one driver 4 to the other.
Dice Rolls.
Instead of rolling1d6 on tables roll 2d6. Higher rolls are always better. All tables have been adjusted to reflect the changes.
Advantage or Disadvantage.
When rolling with Advantage or Disadvantage roll 3d6 instead of 2. For Advantage add the highest 2 dice. For Disadvantage add the lowest 2 dice. In both cases ignore the 3rd die.
Down Force Settings (for winged cars).
Before assigning build points the player must choose the downforce of each car and use the corresponding row on the Performance Chart. The player must choose one of the following settings for each of their cars independently:
Down Force
Advantage
Disadvantage
Normal
None.
None.
Strong
Chance Table, Testing Brakes
Exceeding Acceleration and Top Speed
Weak
Exceeding Acceleration and Top Speed
Chance Table, Testing Brakes
Grid Order.
There are 4 grid groups. Cars in a lower numbered grid group will be placed on the starting ahead of cars in a higher numbered grid.
Step 1: Place all cars in a grid group based on their starting speed:
Start Speed
Grid Group
80mph
2
60mph
3
40mph
4
Step 2: Starting with cars in group 4, players may spend 1 wear point to move a car into the next lower numbered grid group. A car may only move down one grid from its starting group.
Step 3: Starting with the lowest numbered grid group containing cars, place cars on grid starting positions. If there is more than one car in a group, then the players roll 2d6 for each car. A player may spend a skill point to roll with Advantage. The car with the highest roll result is placed on the grid first. Tied cars will continue to roll off until the tie is broken. Spent wear and skill point are not available for the race.
Late Breaking.
To avoid a collision or slow down for a corner, a player may choose to reduce his written speed before moving. The speed reduction takes place in the space before the collision would occur or before a corner is entered. Consult the Deceleration Chart and add 20 to the total amount the car is over its Max Deceleration. If the player chooses not to slow down to avoid a collision, then use the normal collision rules.
Pass Through.
When all lanes are blocked on a straightaway, instead of a collision a player may attempt to pass through one of the squares containing another vehicle. If not blocked, then the passing player may spend 1 wear or roll on the Pass Through Table. The player may spend a skill to roll with advantage.
The player being passed through may allow or attempt to block the pass through. If the player attempts to block, then the passing player may call off the passing attempt or continue. If the passer continues, then both players must roll on the Pass Through Table with Disadvantage (roll 3d6 add lowest 2). You may spend one skill point to nullify the Disadvantage.
Pass Through Table
2D6
Passer
Blocker
7-12
Successful Pass.
No effect
3-6
Spinout.
Spinout
2
Spinout and use one wear.
Spinout and use one wear
Corner Acceleration.
Players may accelerate a car starting on the last space of a corner (the last space with a speed limit). Cars starting in a corner, but not in the last space of a corner, may not accelerate. Cars that spin in a corner may accelerate using start speed on their next turn, even if they are not on the last space of the corner. Cars starting in the last space of a corner are not impacted by the space’s speed limit.
Long Tracks
If 1 lap of a track is equal to or exceeds the length of an average 3-lap race and one lap is planned, then calculate Wear and Skill points as if the race was 3-laps. This rule applies to tracks like Steve’s realistically long Nurbergring.
Scoring
During a race, the first car to complete the 1st lap receives a bonus point. The first car to complete the 2nd lap also scores a bonus point. All cars that complete a race score points. Cars that do not finish the race do not score points (unless they earned bonus points for leading laps 1 or 2). If 12 or fewer cars start a race use the following formula to determine finishing points: 1st = Number of Cars +3; 2nd = Number of Cars +1; 3rd the Number of Cars -2; 4th = Number of Cars -3; 5th = the number of cars -4; etc. Continue this pattern. If more than 12 cars start a race, then use 12 for the Number of Cars in the above formula. Cars finishing beyond 12th place receive 1 point.
Updated Charts:
Start Speed Chart
2d6 Roll
Result
6 – 12
Successfully Exceed Start Speed by 20mph
4 – 5
Lose Grip – Set Speed to 20 mph
2 – 3
Stall – no movement this turn
Note: May spend one skill point to avoid roll. If a car stalls 2 turns in a row it is out of the race.
Acceleration Chart – roll when exceeding Acceleration Rate or Top Speed
1st “2-4” rolled
Engine Damage – lose 20 mph in both Acceleration (minimum 20 mph) and Top Speed (min 140 mph) values for duration of race, including current turn
2nd “2-4” rolled
Engine Burned Out – out of race
Note: May spend skill point to avoid roll. Strong Downforce rolls with Disadvantage. Weak Downforce rolls with Advantage.
Deceleration Chart – roll when exceeding Deceleration Rate
MPH over max deceleration
Penalty
20
Use 1 Wear point OR Test Brakes
40
Use 1 Wear pointsAND Test Brakes OR Use 2 Wear points
60
Use 2 Wear points AND Test Brakes
80
Use 2 Wear points AND Spinout AND Test Brakes
Test Brakes
1st “2-4” rolled
Use 1 Wear point AND wear penalties for Deceleration and Cornering are doubled for duration of race.
2nd “2-4” rolled
Brakes Burned Out – out of race
Note: May spend skill point to avoid roll. Strong Downforce car rolls with Advantage. Weak Downforce rolls with Disadvantage.
Cornering Chart – roll when exceeding proper speed limit through any corner space
MPH over Speed Limit
Penalty
20
Use 1 Wear point OR roll on Chance Table
40
Use 2 Wear points OR Use 1 Wear points AND roll on Chance Table
60
Use 2 Wear points AND Spinout OR Use 2 wear points AND roll on Chance Table
80
Crash! – out of race
Chance Table
2d6 Roll
Result
8 – 12
Safely Cornered
7
Skid – Reduce Speed to 20mph under speed limit
4 – 6
Spinout
2 – 3
Crash! – out of race – roll on the Crash Chart
Note: Spend Skill Point to avoid roll. Strong downforce car rolls with Advantage. Weak downforce car rolls with Disadvantage.
Pass Through Chart
2D6
Passer
Blocker
7-12
Pass Through
No Penalty
3-6
Spinout
Spinout
2
Spinout and Use One Wear
Spinout and Use One Wear
Notes: If unblocked while passing through, use 1 Wear or consult the pass through chart. If blocking occurs, both drivers roll on the Pass Through Chart with disadvantage (one skill may be used to nullify the disadvantage).
Crash Chart – If speed under 60mph, then roll with Advantage. If speed over 100mph, then roll with Disadvantage.
2D6
Result
8 – 12
No Significant Injury
4 – 7
1 Race Injury
2 – 3
1D6 Race Injury (If 6 is rolled then the result is a Season Ending Injury and roll again. If another 6 is rolled then result is Fatal Injury.)
Notes: After missing a race, a Race Injury is reduced by 1. In order for an injured driver to race, the driver’s team must spend 1 Skill point for each point of Race Injury. If an injured driver races, then Race Injuries are not reduced and additional skill points may not be spent on the driver during the race. If an injured driver sustains additional Race Injuries, add them to the total of existing Race Injuries. Injured drivers roll with disadvantage.
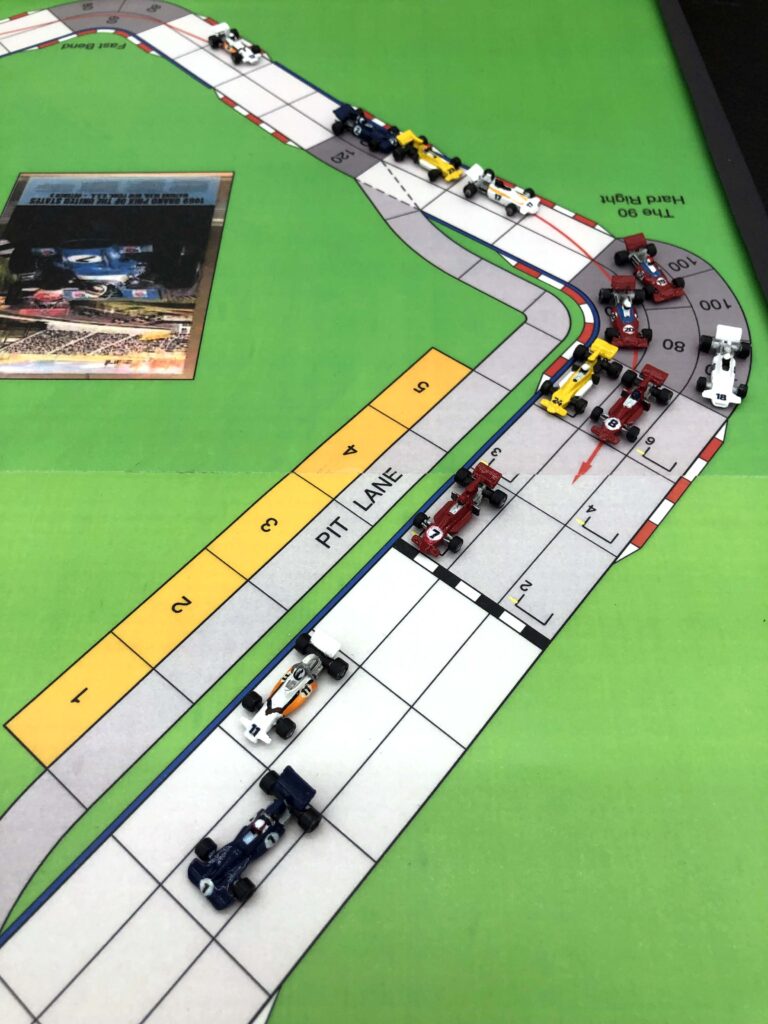
Twelve cars, including season champion Ronnie Peterson, occupied the grid at the US Grand Prix.
Hulme in the the white McLaren jumped of the front row and took an early lead. Stewart, who started on pole, battled Hulme ahead of the pack throughout the first lap with Peterson on their heals. The Blue #1 Tyrrell completed the first lap ahead of the McLaren.
Stewart leads start of second lap at Watkins Glen 2022.
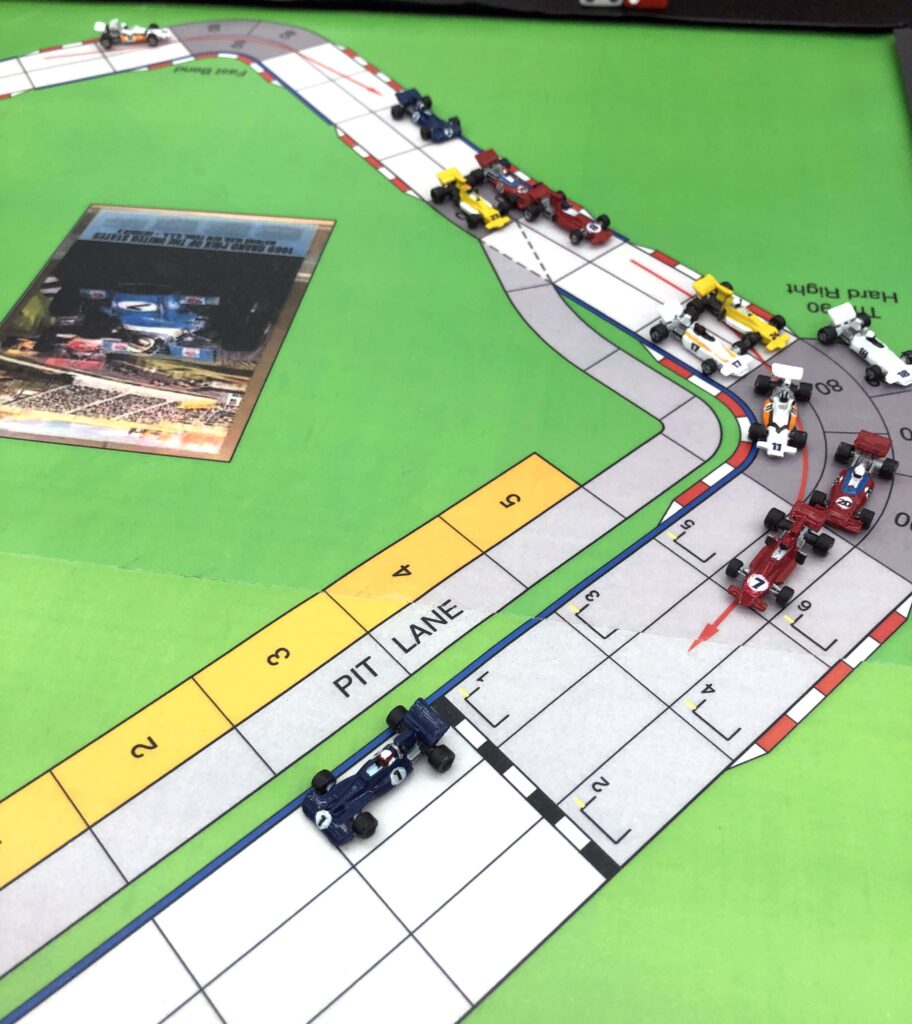
During lap 2, Stewart and Hulme continued an epic battle not only for the race but also for second place in the championship. The Tyrrell and the McLaren set a blazing pace. Meanwhile Galli in the red Martini Techo began to move up. The McLaren faltered and Hulme was passed by Peterson and Galli on the last corner of Lap 2.
Stewart clears the line ahead of the pack at the start of lap 3 of the US Grand Prix.
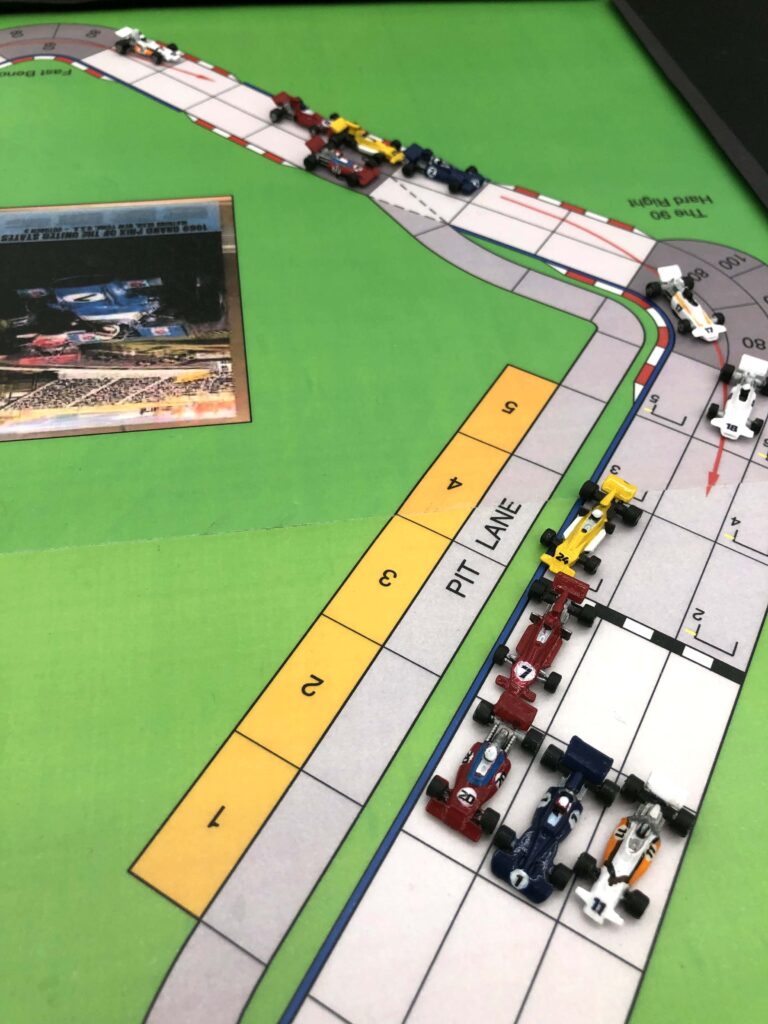
Galli made a run at the leader while Peterson and Hulme battled for third. Then Peterson blasted past Galli. Stewart’s Tyrrell slowed and they began to close the gap with the leader. Galli slipped into the inside of Stewart going into the last Hard Right to take the lead. Galli, Stewart, and Hulme were 3 wide across the finish line with Galli taking the win!
Three wide across the finish line at Watkins Glen 2022.
Race details follow:
1st Steve (N. Galli) 60/40/20/160/4 S 2nd Den (J. Stewart) 80/40/20/160/4 S** 3rd Ray G. (D. Hulme) 60/20/40/160/6 S 4th Travis (R. Peterson) 60/40/20/160/4 S 5th Dave (M. Buettler) 60/20/20/180/4 S 6th Terry (C. Reutemann) 60/40/20/160/4 S 7th Terry (G. Hill) 60/40/20/160/4 S 8th Steve (D. Bell) 60/40/20/160/4 S 9th Dave M. (J. Oliver) 80/20/20/160/4 S 10th Travis (N. Lauda) 60/40/20/160/4 S 11th Ray G. (P. Revson) 60/20/20/160/4 12th Den (F. Cevert) 60/20/20/160/4 S
The race concluded the 2022 Speed Circuit season our 12th running of the series. Congratulation to Travis for leading Ronnie Peterson and the STP March racing team to a resounding championship victory.
In 2023 we will race with teams from the 1973 F1 season. Hope to see you at the races.
Eight teams filled out the grid for the Italian Grand Prix. Dave led Guthrie racing to its first pole position. Guthrie’s Beuttler shared the front row with this season’s champion, Peterson in the STP March. Brabham’s Reutermann and McLaren’s Hulme secured the second row.
During the initial lap, Beuttler and Peterson raced side by side ahead of the pack. By the time group approached the Curve de Lesmos, Stewart had picked up several positions as he cut a path toward the leaders.
As they exited the Lesmos, Beuttler maintained his lead while Hulme and Stewart threatened Peterson’s position. But Peterson exploited the superior speed of his weak down force setup to outrun the others and secure the lead just before entering the Parabolica. The Brabham’s engine began to make a terrible noise, lose power, and Reutemann began to fall back.
Peterson, Beuttler, and Stewart were three wide through the Parabolica. Peterson exited the Parabolica in the lead followed by Stewart, Hulme, Beuttler, and Fittipaldi in a four wide formation! Peterson charged down the straight to secure the bonus point. Stewart slipped streamed Peterson and they were side-by-side to start the second lap. Reutemann continued to nurse his sick car.
Peterson began to struggle with the weak down-force setup. Stewart outmaneuvered Peterson through the Curva Grande and took the lead. Then Beuttler and Galli passed Peterson in the Lesmos.
Stewart and Beuttler battled for the lead through Valone and into the Parabolica. Peterson tried to regain momentum and passed Galli. Then Peterson flew out of the Parabolica, but this time Stewart crossed the line first to gain the bonus point. The Brabham may have lost a gear or two, but Reutermann was able hold it together for another lap.
Peterson took the lead going into the Curve Grande, but had lost the inside position going into the Parabolica. Beuttler and Galli were in hot pursuit of Stewart and Peterson. Stewart took the lead once again exiting the Lesmos. Beuttler and Galli passed Peterson as the March became more and more unstable in the corners. Stewart seemed in position to win.
A puff of smoke emanated from the rear of Stewart’s Tyrell as he exited the Valone and he slowed. Beuttler and Galli passed Stewart while Peterson vied for his position. Stewart out broke Galli and Peterson to regain some lost ground. The 4 leading drivers charged into the Parabolica. Peterson spun-out. Beuttler emerged in the lead followed by Galli and Stewart. Then the Tyrell’s engine exploded into a ball-of-fire and black smoke forcing Stewart to glide the car to a stop. Beuttler crossed the finish line first to win the race followed closely by Galli. Fittipaldi and Hulme had been battling and swapping positions throughout the race. Fittipaldi won the battle and finished in fourth place just ahead of Hulme.
Congratulations Dave!
Race details follow.
1st Dave (M. Beuttler) 80/20/20/160/4 S 2nd Steve (N. Galli) 60/40/20/160/4 S 3rd John H. (E. Fittapaldi) 40/20/20/160/6 S 4th Ray G. (D. Hulme) 60/20/20/160/5 S 5th Travis (R. Peterson) 60/40/40/180/6 W* 6th Ray R. (H. Ganley) 40/20/20/160/5 S 7th Terry (C. Reutemann) 60/40/20/160/4 S DNF Den (J. Stewart) 60/40/20/160/4 S*
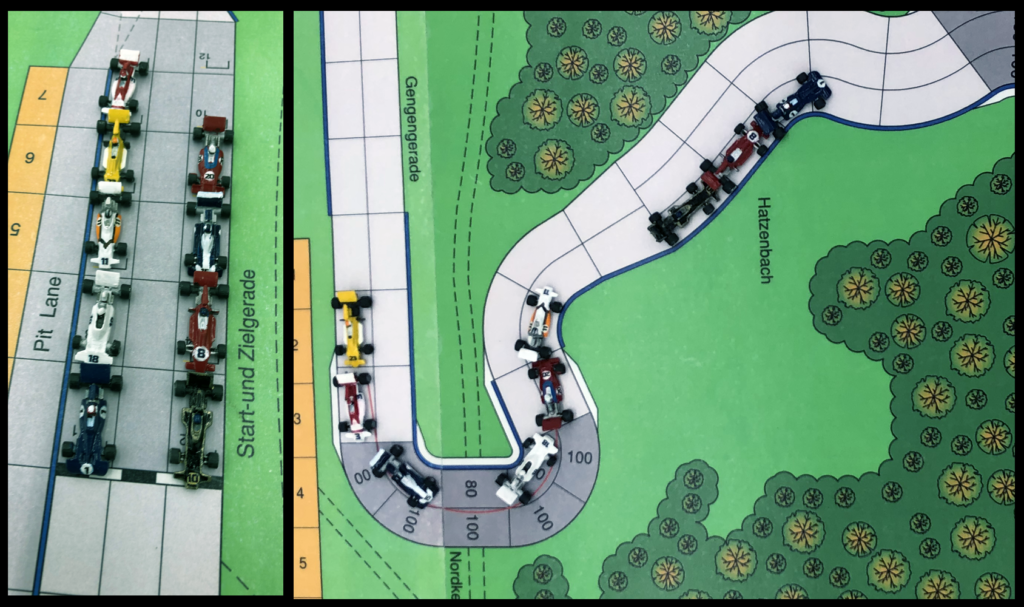
Nine teams faced off at the “Green Hell”, the giant German Grand Prix Nurbergring course. The field included veterans, one rookie manager (Dave-Team Guthrie), and the surprise appearance of Adam managing Team Surtees.
Stewart placed Elf Tyrell in the pole position for the first time this season. John Player Lotus’ Fittipaldi shared the front row with Stewart. Reutemann and Peterson, the season championship points leader, occupied the second row.
Stewart blasted off the line and was initially challenged by Fittapaldi, but Peterson charged by Fittapaldi. Hulme in the McLaren and Galli in the Martini began working their way through the pack.
Peterson pushed his red #8 March past Stewart and was first past the checkpoint 1, but then his engine began to smoke and he slowly rolled off the course. Surtees pressured Reutemann who struggled in the Brabham.
Galli made a brilliant move in the Karnssell to slip by Fittapaldi and then was first across the second checkpoint just ahead of Stewart. Unable to keep pace with Galli’s faster Martini, Stewart conceded the position. Steve’s Martini team lead a race for the first time this season.
Hulme and Reutemann passed Fittapaldi. Then Hulme pressed Stewart. Fittapaldi tried, but failed to recapture his position from Reutemann. Galli crossed the finish line just ahead of Stewart and Hulme securing Martini’s first victory! Reutemann finished ahead of Fittipaldi while Surtees, Beuttler, and Ganely flew down the front straight side-by-side.
Congratulations Steve! Great track and fantastic race.
Race details follow:
1st Steve (N. Galli) 60/40/20/160/4 S* 2nd Den (J. Stewart) 80/40/20/140/4 S 3rd Ray G. (D. Hulme) 60/40/40/140/4 S 4th Terry (C. Reutemann) 60/40/20/160/4 S 5th John H. (E. Fittapaldi) 60/40/40/160/4 S 6th Adam (J. Surtees) 60/20/40/140/5 S 7th Dave (M. Buettler) 60/20/60/140/4 S 8th Ray R. (H. Ganley) 40/40/20/140/6 S DNF Travis (R. Peterson) 60/40/20/160/4 S*